
 ASTRO SWISS KNIFE
ASSEMBLY
ASTRO SWISS KNIFE
![]()
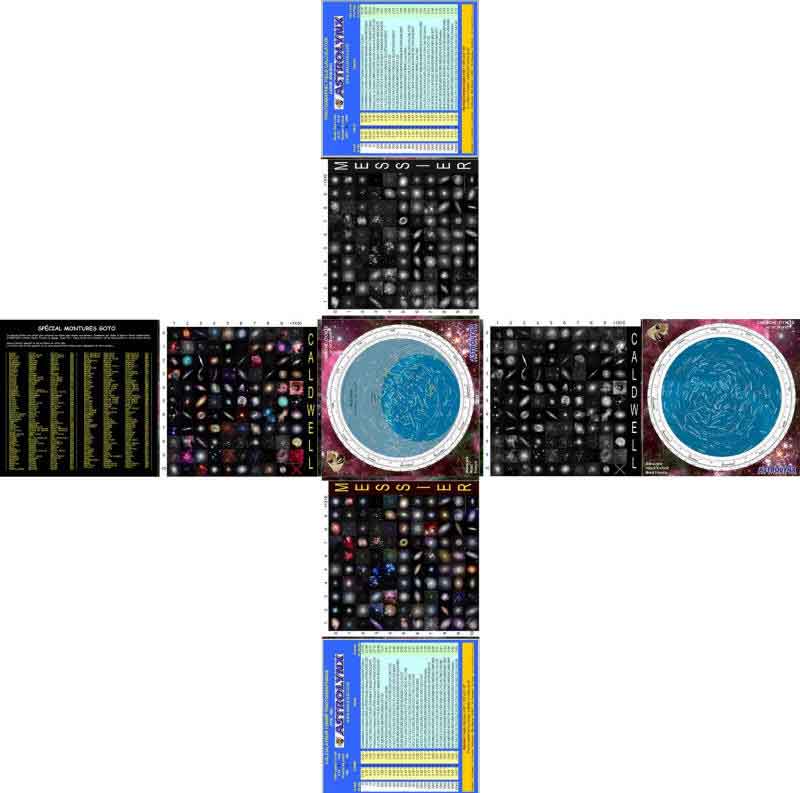
The Starfinder was completed by a set of documents assembled so as to be deployed in triptic format, i.e. in groups of 3 documents at a time depending on the task to be carried out.
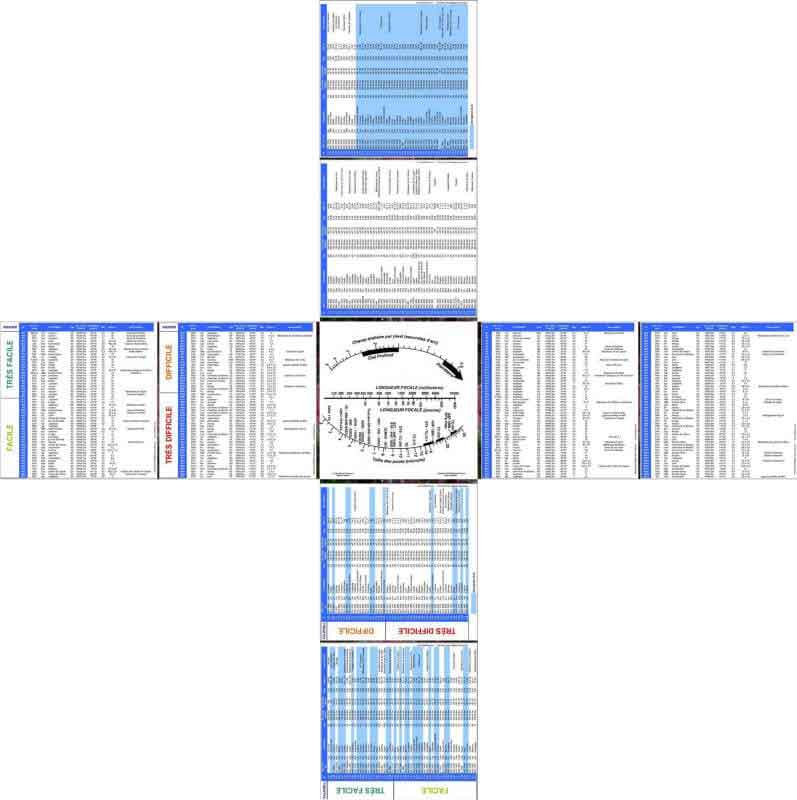
The CALDWELL and MESSIER object tables give the NGC/IC/Sh correspondence, the constellation abbreviated, the name of the constellation, the type of object, the Right Ascension, the Declination, the magnitude, the size and the usual name known.
The object types are:
| GC | Globular Cluster. | |
| OC | Open Cluster. | |
| DS | Double Stars. | |
| EG | Elliptical Galaxy. | |
| IG | Irregular Galaxy. | |
| SG | Spiral Galaxies. | |
| BN | Bright Nebula. | |
| DN | Dark Nebula. | |
| PN | Planetary Nebula. | |
| SNR | SuperNova Remanent. |
- Preparation for an observation of the MESSIER Objects.
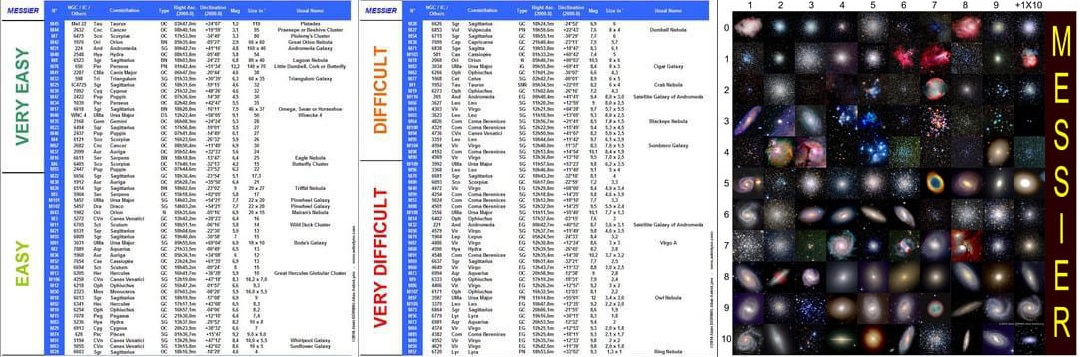
MESSIER objects in color - Tables of objects classified by difficulty.
- Identification of MESSIER Objects during an observation.
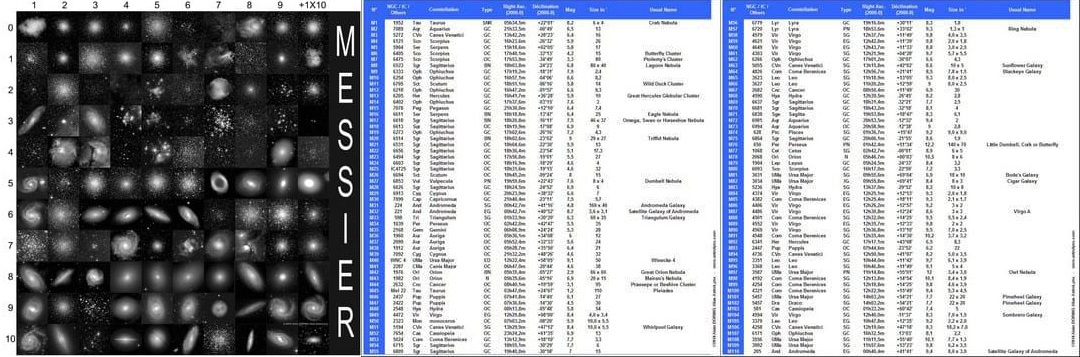
MESSIER objects in black and white - Tables of objects classified by numbers.
- Preparation for an observation of the CALDWELL Objects.
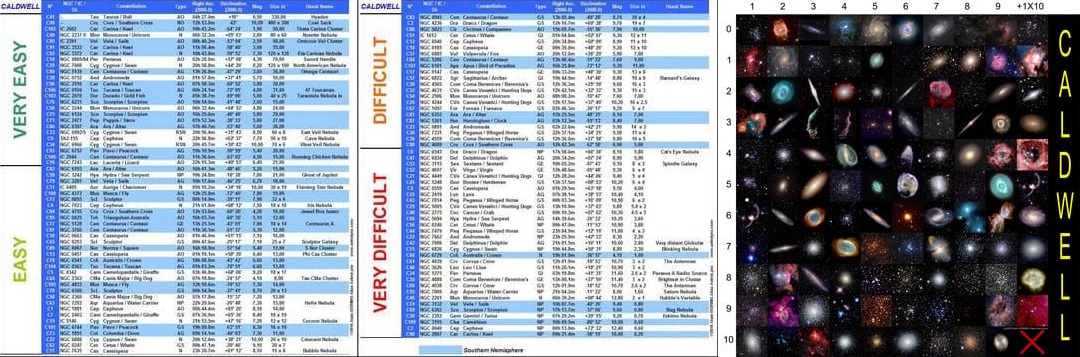
CALDWELL objects in color - Tables of objects classified by difficulty.
- Identification of CALDWELL Objects during an observation.
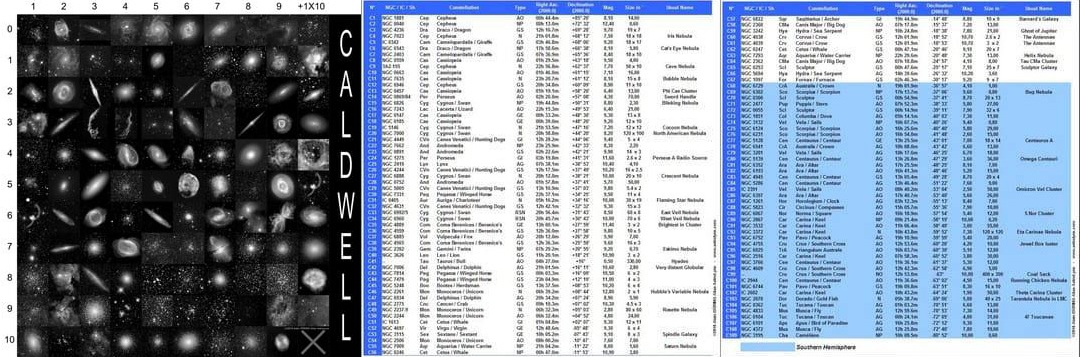
CALDWELL objects in black and white - Tables of objects classified by number.
- List equipment to prepare a capture.
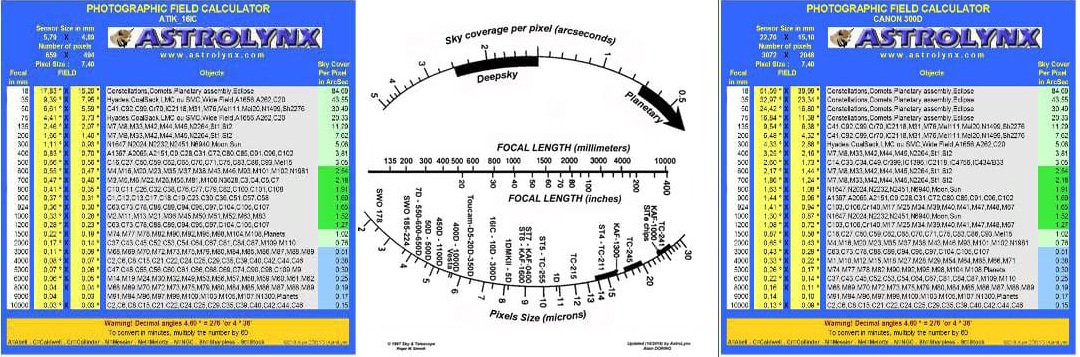
The central chart is associated with the tables of the sensors chosen to define the equipment to be used.
Choice of field, sensor, optics, focal length and object.
Printing all boards must be done with the same printer and the same printing parameters, especially the scale percentage to be to having the correct dimensions when cutting. So be careful with prints made at shorter or longer intervals. Surprises can be unpleasant. We can sometimes be tempted to adapt the printing scale to enlarge as much as possible or to reduce the size to make it smaller. OK, but everything must be printed consecutively, checking each time to verify the dimensions. A word to the wise... Hello!
The front download contains 5 plates to print directly.
- Messier painting in color.
- Messier Painting in Black and White.
- Caldwell painting in color.
- Caldwell Painting in Black and White.
- Table of main stars used for GOTO pointing Classified in alphabetical order with corresponding constellations.
Note: Colored tables will preferably be used for preparing an observation. Black and white charts will be useful for identifying an object at night through the eyepiece. These tables include figures on the abscissa and ordinate to determine the object number.
It remains to choose the favorite observation location to obtain the starfinder.
Using the same location, request the GOTO version.
Click on the photographic field calculators and choose 2 sensors.
The back download contains the 9 necessary plates.
- Messier by Numero_1.
- Messier by Numero_2.
- Messier by Difficulty_1.
- Messier by Difficulty_2.
- Caldwell by Numero_1.
- Caldwell by Numero_2.
- Caldwell by Difficulty_1.
- Caldwell by Difficulty_2.
- CCD Star Field Calculator.
Which gives a total of 18 plates to print.
Once the boards are finished printing, cut using cutters, scissors, cutting knives and/or scalpels on a cutting board.
Remark! Precision is essential. This work requires a little attention to detail. Wanting to finish before starting is not on the agenda.
Each board contains an image, two strips (thickness mark) and an assembly tab which will connect the boards to other.
If you have a board of compressed wood or plywood large enough, nail a slat to it to properly align the boards to be assembled.
Cut two slabs the exact size of the star finder which will serve as a setting and pressing block. Prepare some fairly heavy books or something else to ensure gluing while it sets.
We will use white liquid paper glue. You can add a little water to make the glue more liquid if necessary, but not too much, the glue should not show through the paper. You have another glue no problem. In all cases, tests will be necessary with the scraps of paper which will not be missing after the cuts. Spread the glue well and not generously, especially on the edges. Be quick, don't delay.
Bring water, a sponge, rags, a hairdryer, a smoothing roller, if you have one. Rubbing is not recommended as scratches will appear on the surface of the photo paper.
To ensure a long life for our Swiss astro knife, the folding points will be reinforced using caliquot (fabric for book bindings). Failing that, we can consider using several layers of hydrophilic gauze, it's always better than nothing. Here too, a few tests are desirable before final assembly.
The boards will be pre-folded with the help of 2 rulers and flattened before assembly and gluing. This will make the finalized assembly easier to operate.
The assembly tabs will be hammered all along the outer edge in order to reduce the thickness and reduce the appearance of a mark after gluing. Be careful not to mark the document which must be impeccable.
Start by assembling the boards as follows:
- The Messier branch in color.
- Front -> Messier color images + Photographic field calculation sensor 1.
- Back -> Messier Table by Numero 1 + Messier Table by Numero 2.
- The Messier branch in Black and White.
- Front -> Messier black and white images + Photographic field calculation sensor 2.
- Back -> Messier Table by Difficulty 1 + Messier Table by Difficulty 2.
- The Caldwell branch in color.
- Front -> Color Caldwell Images + Star List GOTO Mount.
- Back -> Caldwell Table by Numero 1 + Caldwell Table by Numero 2.
- The Caldwell branch in Black and White.
- Front -> Black and white Caldwell images + GOTO card.
- Back -> Caldwell Table by Difficulty 1 + Caldwell Table by Difficulty 2.
The most delicate part remains the assembly of the 4 branches with, in the center of front, the starfinder and on the back of it, the CCD Stellar Field calculator.
To do this, use a slat to ensure the alignment of the arms. Take care when assembling to the direction of the arms and the orientation of the starfinder.
You have completed your Astro Swiss Knife and you should be proud of it and I congratulate you. All that remains is to protect your work. I suggest you make a protective case with a sheet of black CANSON measuring 50cm x 70cm - 270grs. It's up to you to imagine the case in which you wish to store the fruit of your work. To keep it for a very long time without color degradation, it must be protected from light.
![]()